Configuring and Uploading Calibration Factors for Soil Instruments D1 Datalogger Systems
1. Introduction
This
guide details the operations needed to obtain engineering outputs from a
Soil Instruments Data Acquisition System (DAS) that has the “Datalogger
output engineering units” addon (D5-1.7). This is done by loading
calibration and/or conversion factors applicable to the individual
sensors using comma separated files (CSV) to the DAS. These factors will
be found on the calibration sheets that come with each sensor. This
guide presumes the user is competent with the operation of Loggernet.
For more information on Loggernet please see the knowledgebase article
“Datalogger Quick Guide” available from www.soilsupport.co.uk.
2. Downloading CSV Files
The
templates that will require to be modified and are applicable to the
DAS’s specific sensor setup will be found within the USR memory drive of
the system. These can be accessed by doing the following steps:
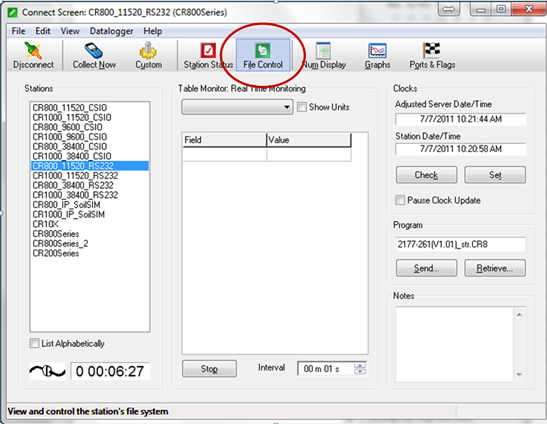
Connect with the logger and access “File Control”
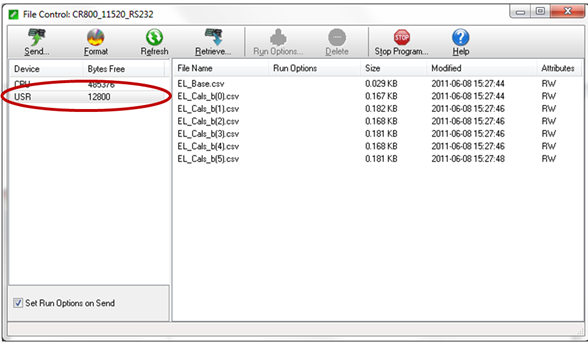
Select “USR” under device on the “File Control” window
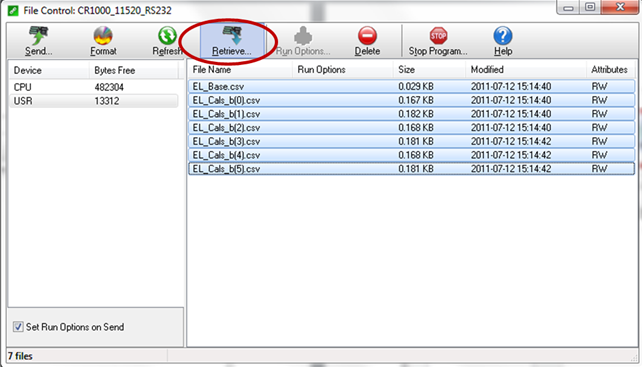
Highlight the CSV files and select “Retrieve”
Save the files for editing/checking
3. Configuring CSV files
NOTE: If
relevant sensor information was available during the production of the
DAS, the calibration factors will already have been setup for the
logger. These will be allowing for the sensors to be wired into the
logger or multiplexer channels in numerical order (smallest to largest)
by their serial numbers. Please follow step
3.1 Identifying the CSV File Type
NOTE: DO NOT change the file names or extension of the CSV files that were originally downloaded from the loggers USR drive, otherwise they will not be recognized by the DAS software when re-uploaded.
The file name will indicate what type of instrument it is for and which factor is needed to be inputted to it.
For example:
IPI_b0.csv
Will need the “b0” calibration factors (can be either mm/m or ArcDegrees) for all the IPI (In-Place-Inclinometers) attached to the logger/multiplexers for the DAS.
For example:
EL_Base.csv
Will need the raw “Base” readings for all of the “EL” (Electrolevels) attached to the logger/multiplexers for the DAS.
3.2 Modifying the CSV Files
NOTE: The recommended software for editing the files is Microsoft Excel. Alternative software can be used for example Textpad, though others may not present the file in an as easily manageable format.
Open the relevant CSV file in excel.
The multiplexer or logger channel will be in the top row of the file the corresponding value will be in the column below.
For example:
(IPI_b1.csv)
Mux_one_chn_one
mux_one_chn_two
mux_one_chn_three
0.02196939
0.21967680
0.21964580
Top row indicating multiplexer number channel number
Second row corresponding value
NOTE: See DAS accompanying wiring diagram for sensor channel wiring.
Save the file ensuring that it is still in CSV format.
These files can then be reuploaded to the USR drive from where they were downloaded.
4. Uploading CSV Files
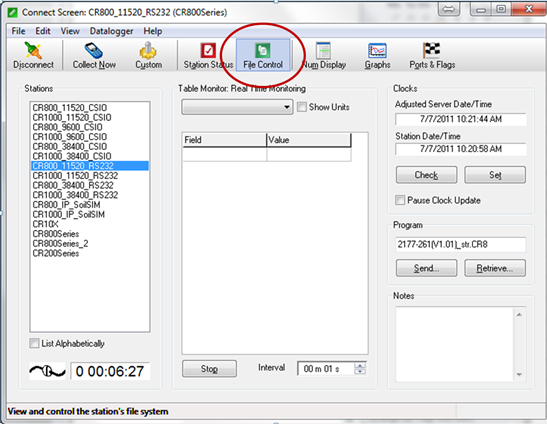
Connect with the logger and access “File Control”
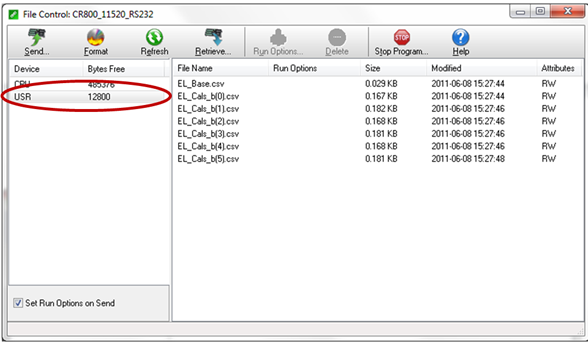
Select “USR” under device on the “File Control” window
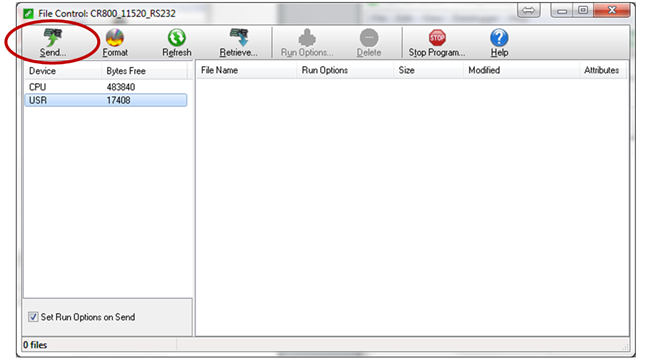
Highlight the CSV files and select “Send”
In the pop up window change the file type to “All Files”.
Select the files for sending.
Select “Open”.
The files will now appear in the Datalogger’s USR drive.
The logger will need to have the power cycled for the program to start using the uploaded files.
3.1 Identifying the CSV File Type
NOTE: DO NOT change the file names or extension of the CSV files that were originally downloaded from the loggers USR drive, otherwise they will not be recognized by the DAS software when re-uploaded.
The file name will indicate what type of instrument it is for and which factor is needed to be inputted to it.
For example:
IPI_b0.csv
Will need the “b0” calibration factors (can be either mm/m or ArcDegrees) for all the IPI (In-Place-Inclinometers) attached to the logger/multiplexers for the DAS.
For example:
EL_Base.csv
Will need the raw “Base” readings for all of the “EL” (Electrolevels) attached to the logger/multiplexers for the DAS.
3.2 Modifying the CSV Files
NOTE: The recommended software for editing the files is Microsoft Excel. Alternative software can be used for example Textpad, though others may not present the file in an as easily manageable format.
Open the relevant CSV file in excel.
The multiplexer or logger channel will be in the top row of the file the corresponding value will be in the column below.
For example:
(IPI_b1.csv)
Mux_one_chn_one
mux_one_chn_two
mux_one_chn_three
0.02196939
0.21967680
0.21964580
Top row indicating multiplexer number channel number
Second row corresponding value
NOTE: See DAS accompanying wiring diagram for sensor channel wiring.
Save the file ensuring that it is still in CSV format.
These files can then be reuploaded to the USR drive from where they were downloaded.
4. Uploading CSV Files

Connect with the logger and access “File Control”

Select “USR” under device on the “File Control” window

Highlight the CSV files and select “Send”
In the pop up window change the file type to “All Files”.
Select the files for sending.
Select “Open”.
The files will now appear in the Datalogger’s USR drive.
The logger will need to have the power cycled for the program to start using the uploaded files.
